
You can also remove clients from a program in bulk via the Import Client Un-enrollments feature.
There are four optional columns in the Client Un-Enrollment Data template that are used to add data to clients: Client ID, Client First Name, Client Last Name, and Client Date of Birth.
If you provide a Client ID (the SureImpact ID), the import tool will match the client based on the Client ID.
If no Client ID is provided, the import tool will attempt to look up a client by First Name and Last name. If there is one matching client, it'll add the data to that client. If there are multiple matching clients, the import will then try to find a match with the specified date of birth.
- In the top navigation, click Programs.
- Click Import/Export Data, and then click Import Client Unenrollments.

- Click Download Template to download the .XLS template required for importing client program unenrollment data.

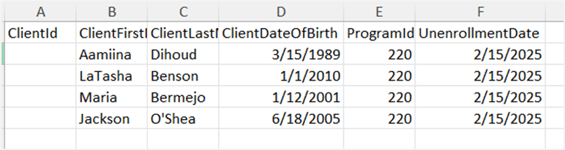
- In the template provided, enter the following information:
-
- Clientid: This is the unique SureImpact ID found in each client’s record.
- ClientFirstName: Enter the client’s First Name.
- ClientLastName: Enter the client’s Last Name.
- ClientDateOfBirth: Enter the client’s Date of Birth.
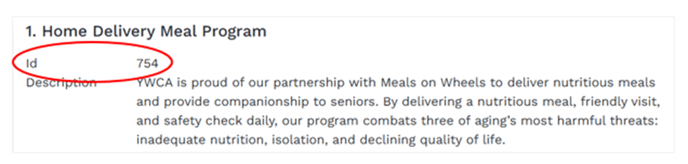
- ProgramId: Each Program in SureImpact has a unique number assigned to it. To find the number for the desired program:
- In the top navigation, click Programs.
- Click the desired Program. The Program number is listed directly below the Program name
- UnenrollmentDate: Enter the desired Program Unenrollment Date. It must be formatted as MM/DD/YYYY.

-
- Once you have entered the client program unenrollment dates you want to import, click Choose File.
- Select the desired file on your computer, and then click Open. You should now see the name of the file you selected next to the Choose File button.

- Click Import. You will now receive a confirmation message that all rows have been uploaded correctly, or a message letting you know which rows in the spreadsheet had errors and need to be fixed.